Viterbi Zoom Rooms
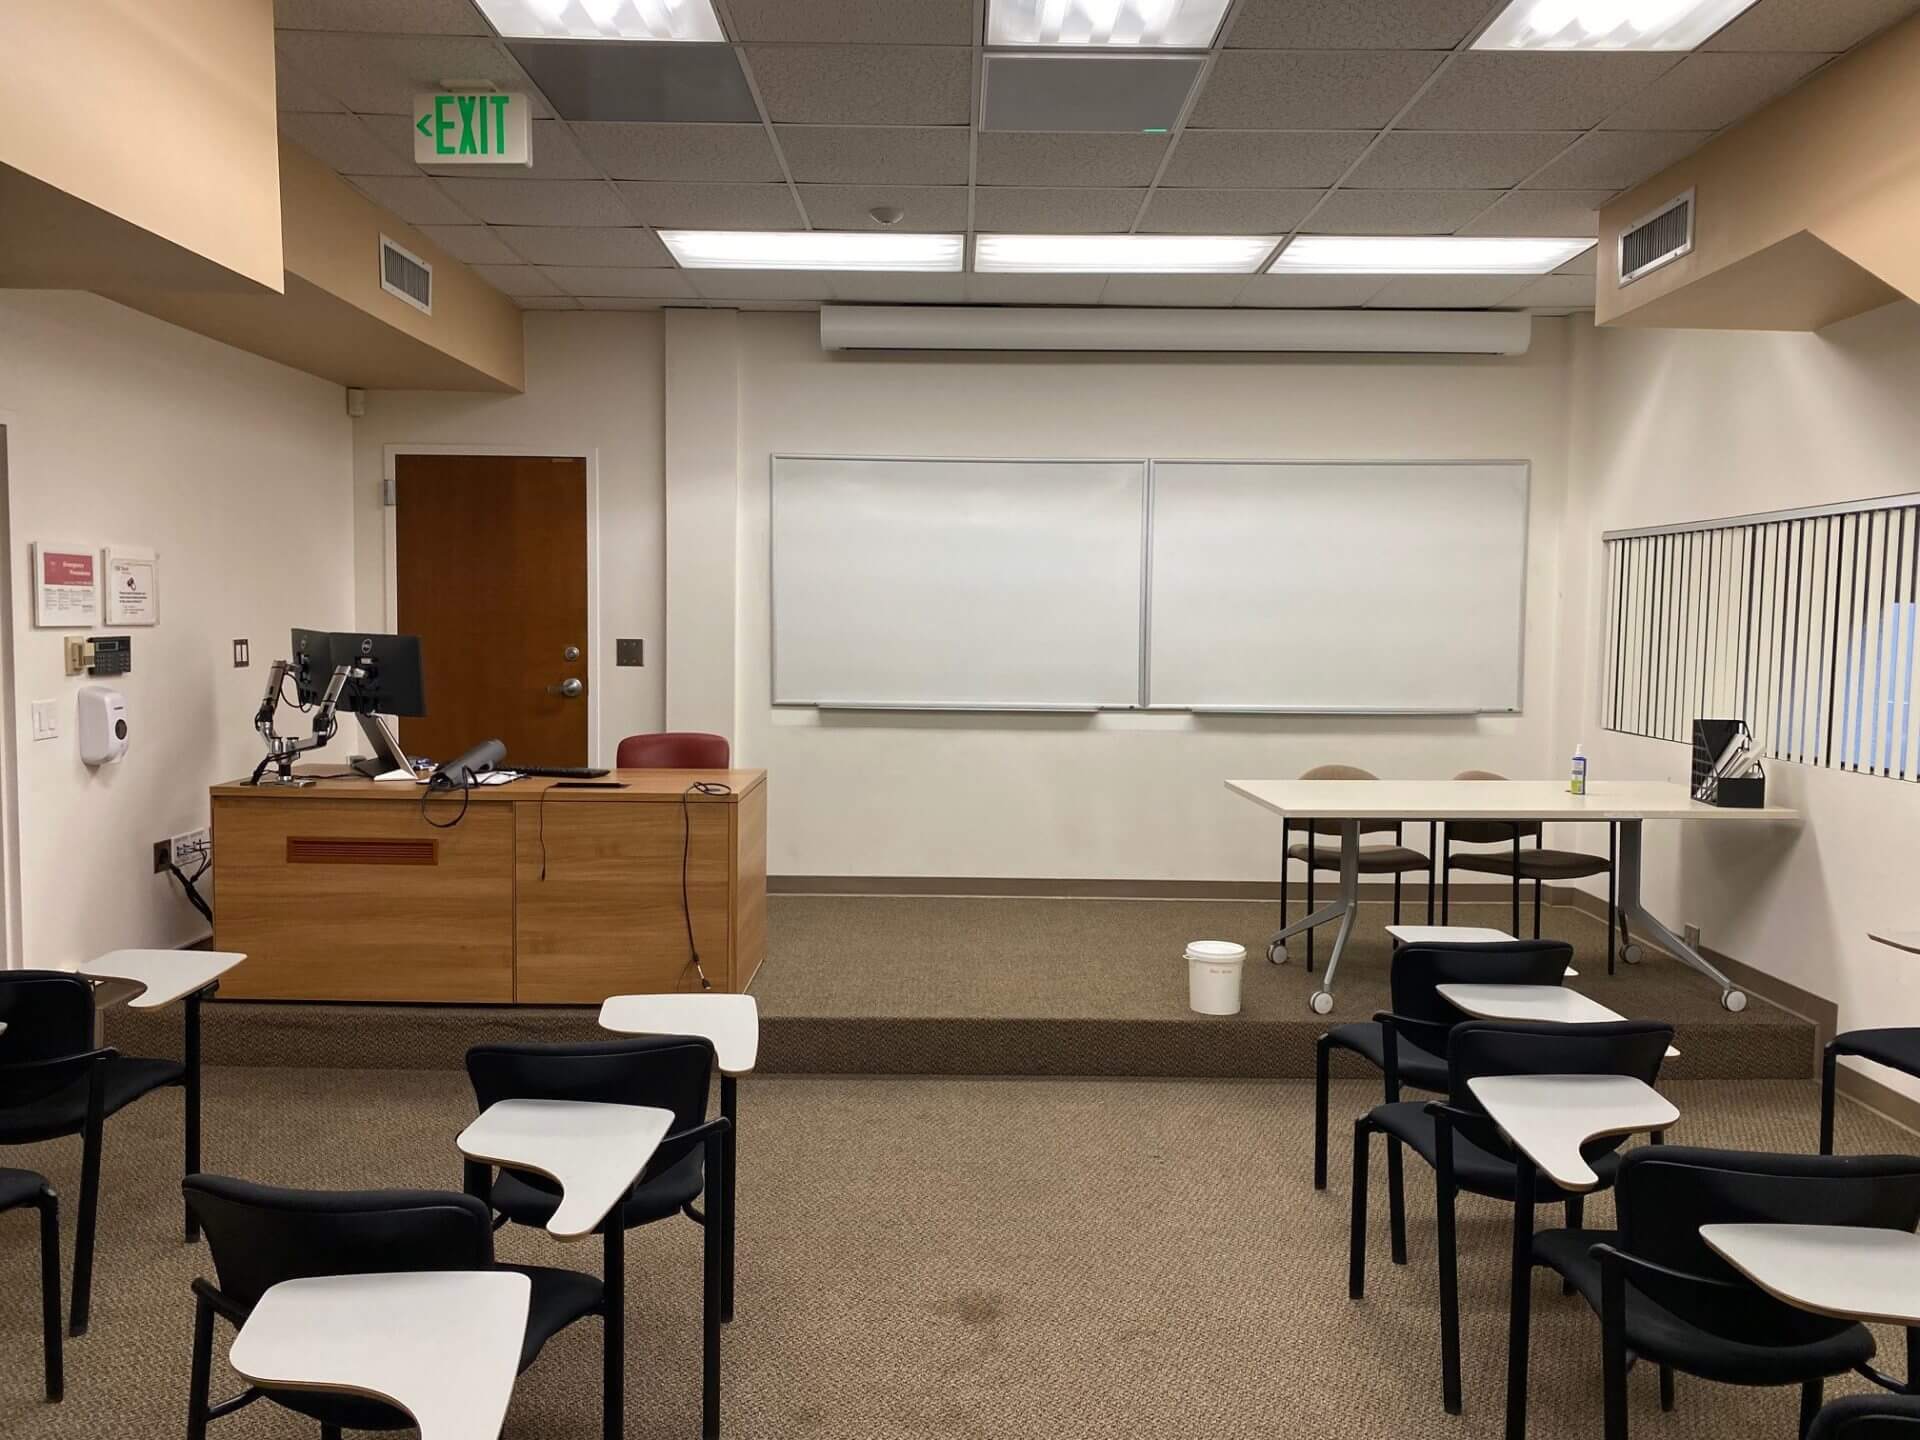
DEN@Viterbi has outfitted various Viterbi classrooms with Zoom Room capabilities. Users can utilize the rooms on their own to connect to their Zoom meetings from the control panel.
- DRB 146
- KAP 107, 160
- OHE 540
- RTH 105, 109, 115 (Coming Soon)
Check myviterbi.usc.edu for room availability and reservations. Contact DEN@Viterbi Instructional Operations for additional questions: denoperations@usc.edu, 213-740-0130
Hybrid class (Zoom and on-campus participants) setup
- Press face of touch panel on the desk to turn on the room system.
- Start your Zoom meeting from your personal device. Do not connect/join audio on your device if prompted by Zoom as you will be using the room’s audio and video signals. You may also turn off your camera on the app.
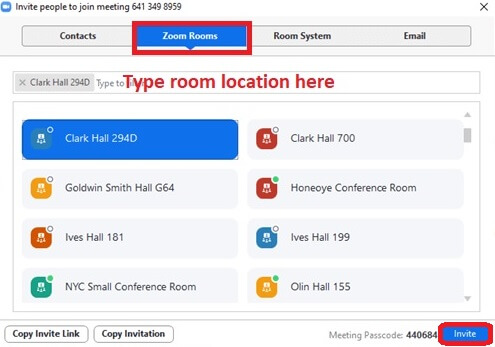
- Select the carrot next to the Participants button on your Zoom app and select Invite

- In the window that appears, select the Zoom Rooms tab at the top and type in your classroom location in the search field (be mindful that there may or may not be a space in between the building’s initials and room number ex. OHE540 or OHE 540). Click on the room once you find it and press the Invite button on the bottom right of the window.
- You will hear the ringer inside the classroom. Press the Zoom button on the top left of the touch panel to initiate the Zoom Wizard page.
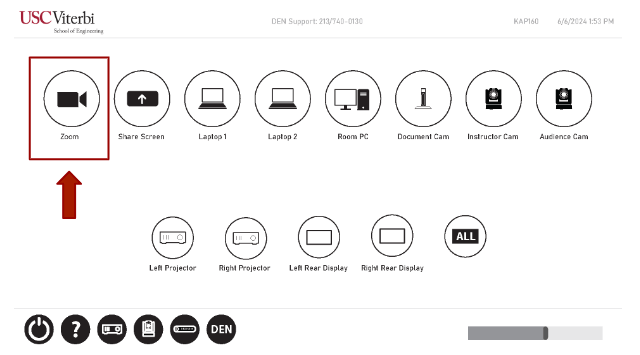
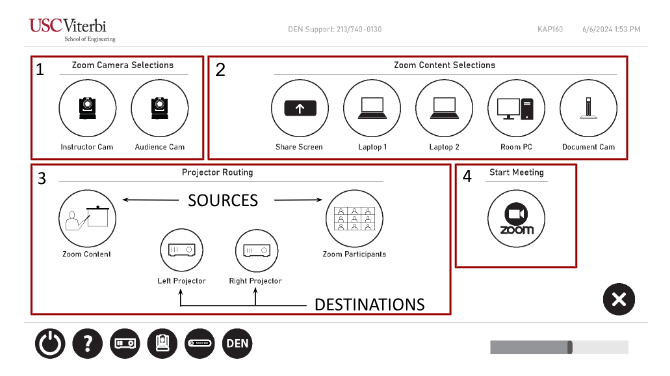
- Select the Camera that participants in the Zoom meeting should see.
- Instructor Cam = Faces the front of the classroom (instructor area).
- Audience Cam = Faces the rear of the classroom (in-class students).
- Select the Content that will be shared to the Zoom participants:
- Share Screen = Wireless device share using pin displayed on screen.
- Laptop1 = Wired device share using Laptop 1 cables (HDMI, USB-C, or VGA).
- Laptop 2 = Wired device share using Laptop 2 cables (HDMI, USB-C, or VGA).
- Room PC = Share the classroom PC. Consult Viterbi IT for login credentials.
- Document Cam = Selecting this device will automatically activate it (you will see a light turn on). Fold up the arm to position the camera and place your content on the base plate.
- Route either the Zoom Content view or the Zoom Participants view to the left and/or right projector by first selecting a source then selecting a destination.
- Once you've made your selections, push this Zoom button to launch the Zoom app on the touch panel. Note: These selections can be changed during the meeting as well.
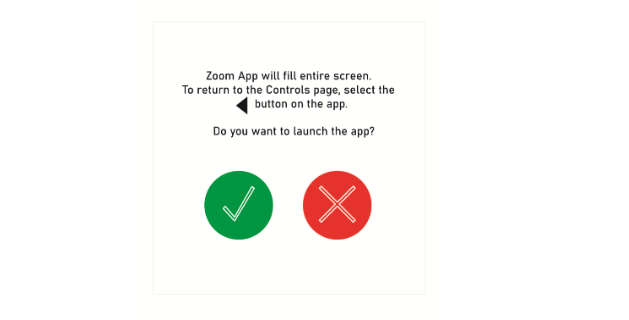
- A pop-up window will ask you to confirm that you want to launch the Zoom App. Push the Green Check Mark to continue.
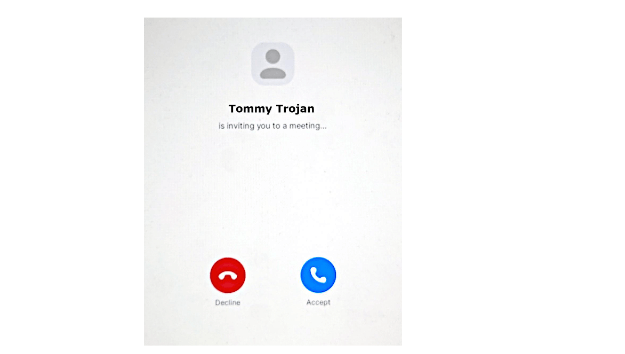
- After launching the Zoom App on the touch panel, you will now see the option to accept the call.
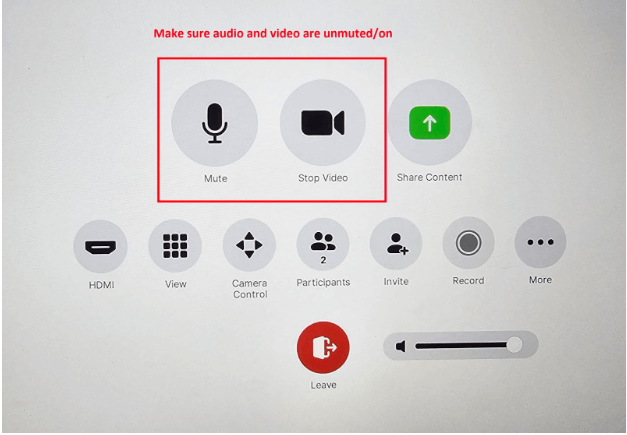
- While in a Zoom meeting, the Zoom App display should look like this. Make sure audio and video are both unmuted/on.
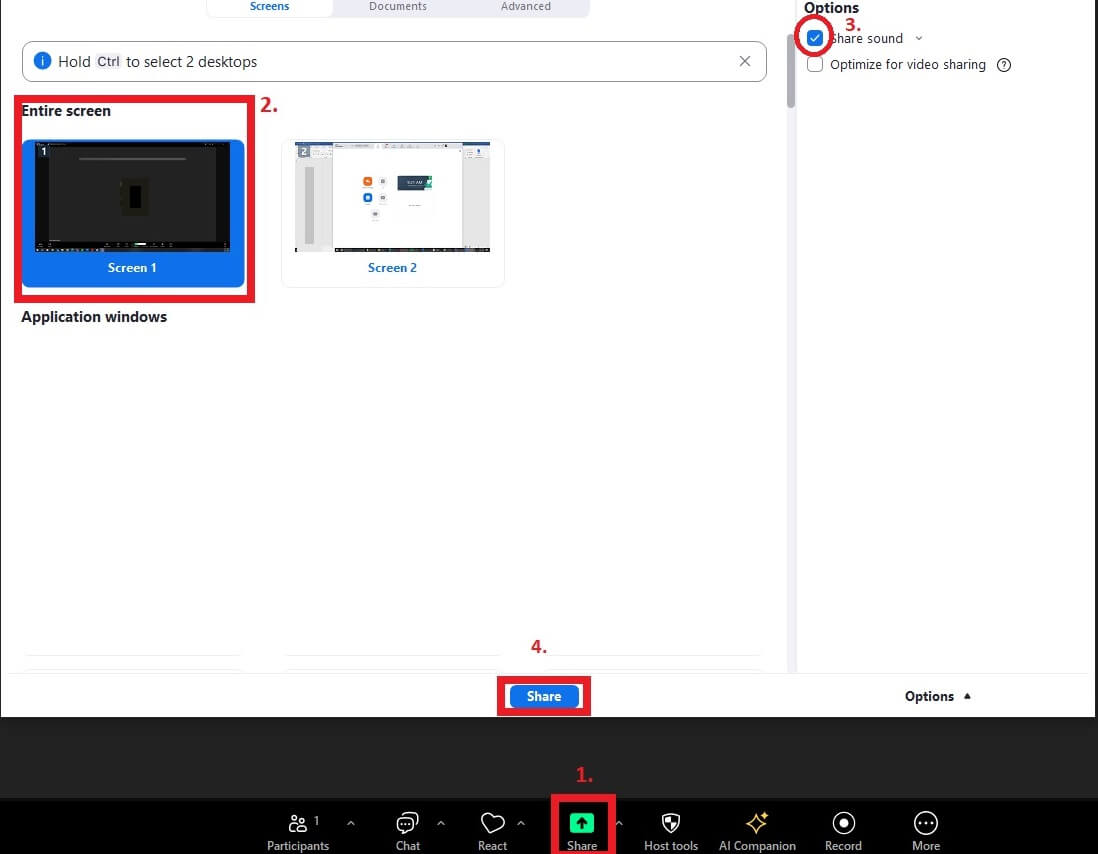
- Return to your personal device and Share your screen via the Zoom app (be sure to also share sound if playing back content with audio).
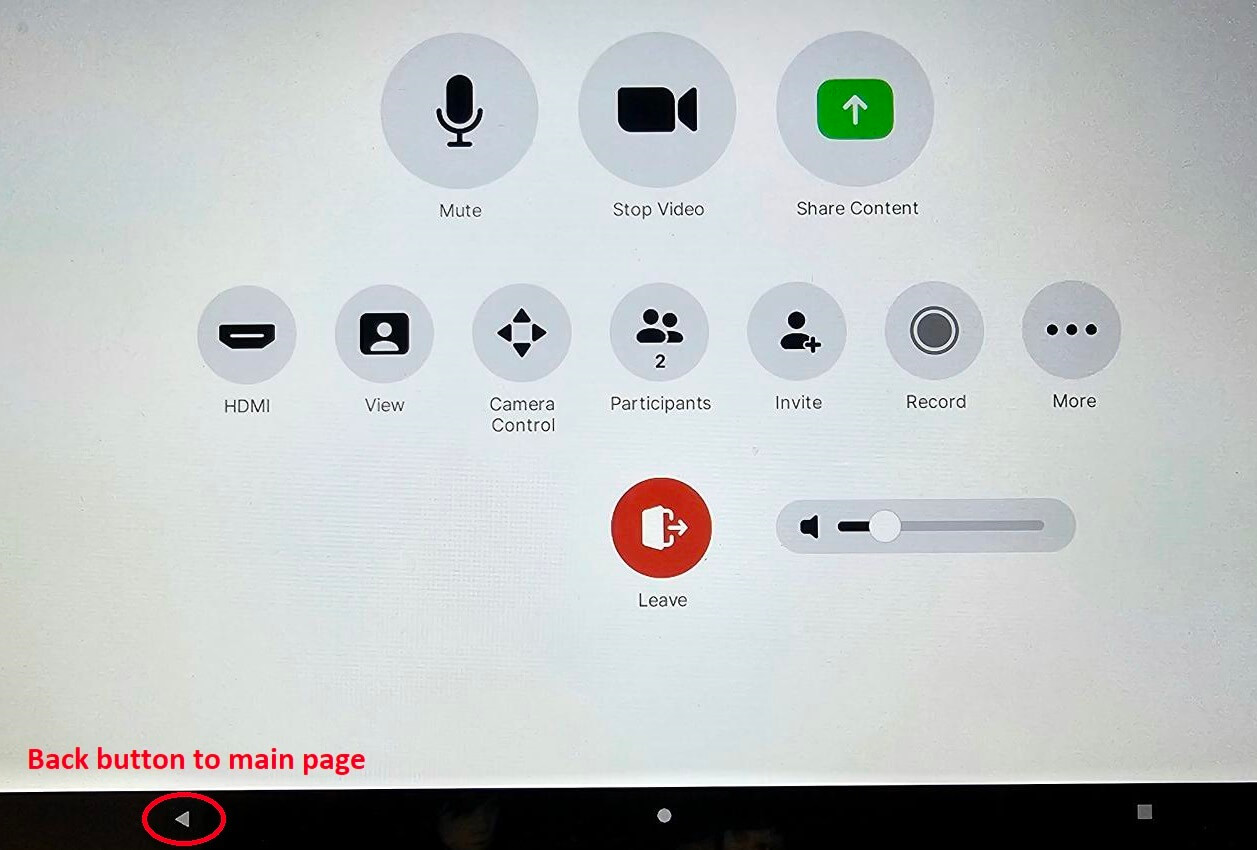
- While running a Zoom meeting, if any changes need to be made to the Zoom Camera, the Zoom Content sharing, or the Projector source routing you can return to the Zoom Wizard page by pressing the back arrow at the bottom left of the Zoom App screen.
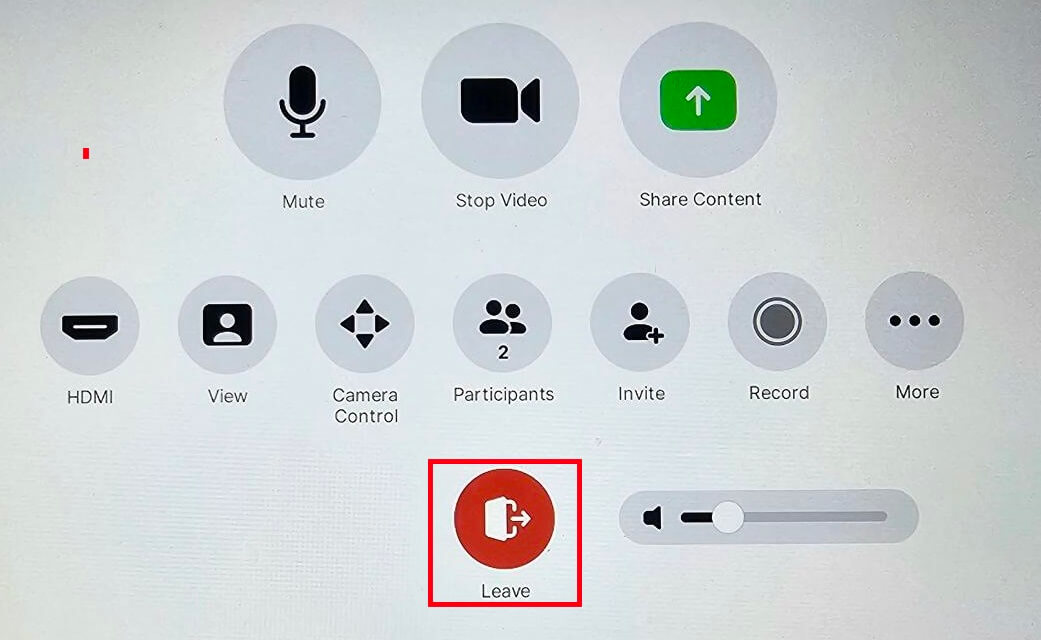
- When your lecture is complete, hit the Zoom button to re-launch the Zoom App on the touch panel (if you were using the Zoom Wizard page) and make sure to leave the meeting.
- Press the back arrow again to leave the Zoom App and return to the Zoom Wizard screen.
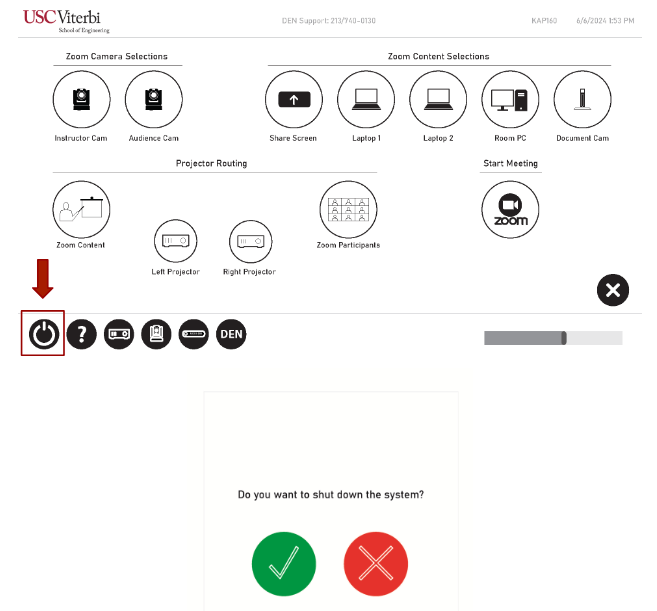
- Shut down the room system by pressing the Power Button in the bottom left. To avoid accidental shutdown, a pop-up window will now appear asking you to confirm the system shutdown. Click the Green Check Mark to confirm.
External device presentation (no Zoom meeting, non-hybrid setup)
- Press face of touch panel on the desk to turn on the room system.
- Open the Zoom application on your device and select the Sign-In option.
- Make sure you are on the Home tab and select “Share screen”
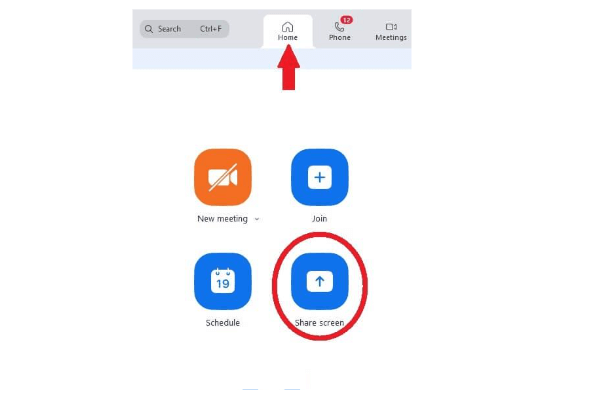
- Enter the share code presented on the top right of the back confidence monitor(s) and/or projector screen. Wait up to 10 seconds for your device’s content to be displayed on the monitors and projector(s).
- When using the Share Screen function from the Zoom app Home page, the "Share Sound" option may or may not be enabled by default (depending on the latest update). While sharing content from your device, you can click the Share icon within the Zoom app's menu bar to open the Content Sharing settings page.

- If the "Share Sound" box on the top right is unchecked, click to enable it now. Then click the blue Share button at the bottom of this window to confirm the changes.
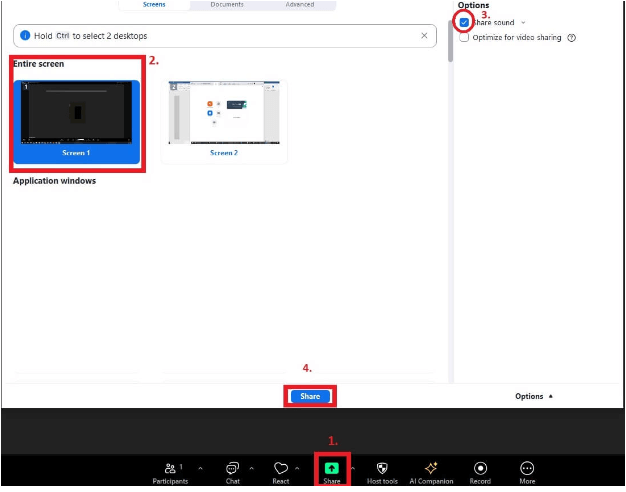
- Test audio/video playback. If you do not hear audio, toggle on or off your external device’s speaker button
- Press face of touch panel on the desk to turn on the room system.
- Select a cable from either the Laptop 1 or Laptop 2 area of the AV cubby hole and plug the cable into your device’s port. HDMI, USB-C, and VGA cables are available. If you need a different connector for your device, we suggest bringing your own adapter.
- Once your device is connected, select the appropriate source on the Source Selection display of the touch panel Home Page and then select which destination(s) you would like that source to be displayed on. Pressing the 'All' destination button will change all of the room displays at once.
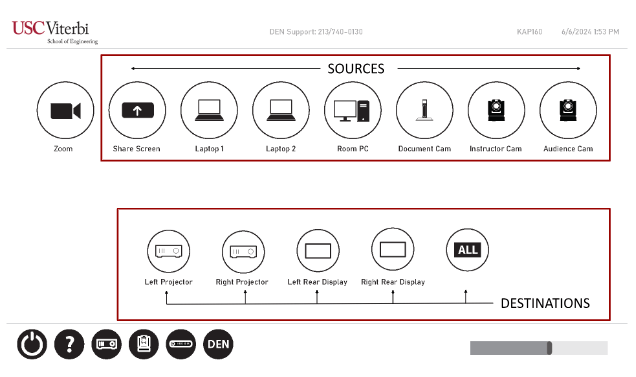
- If you are on any touch panel page other than the Home Page seen above and would like to return to this screen to change the display sources, press the X icon in the bottom right corner of the active screen to return to this Home Page.

Additional Menu Pages
- Pressing the Projector icon at the bottom of any touch panel menu screen will bring up the Room Controls menu page.

- From this page you can turn any individual projector or display on/off. There is also an option to manually toggle the Document Camera on/off.
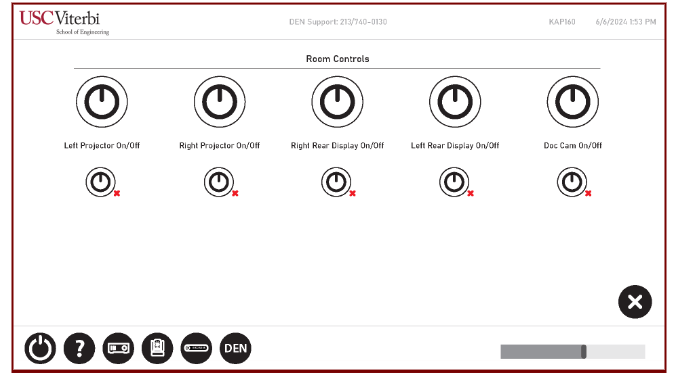
- Once you are happy with the changes you have made here, press the X icon in the bottom right corner to return to the touch panel Home Page.

- Pressing the Camera icon at the bottom of any touch panel menu screen will bring up the Camera Control menu page.

- From this page you can select one of the room cameras and adjust the position, focal length (zoom), white balance, or toggle it on/off as follows:
-
- Select the Camera that you would like to control:
- Instructor Cam = Faces the front of the classroom (instructor area).
- Audience Cam = Faces the rear of the classroom (in-class students).
- Turn the selected camera off/on.
- Reset the White Balance for the selected camera to adjust for a change in lighting conditions.
- Change the position and focal length of the selected camera to one of the pre-saved commonly used camera positions.
- Manually move the position and/or change focal length (zoom) of the selected camera. Adjusting the +/- slider up will increase the rate at which these buttons will move and zoom the camera. Adjusting the +/- slider down will decrease the rate at which these buttons will move and zoom the camera.

- Once you are happy with the new camera settings, press the X icon in the bottom right corner to return to the touch panel Home Page.

- Select the Camera that you would like to control:
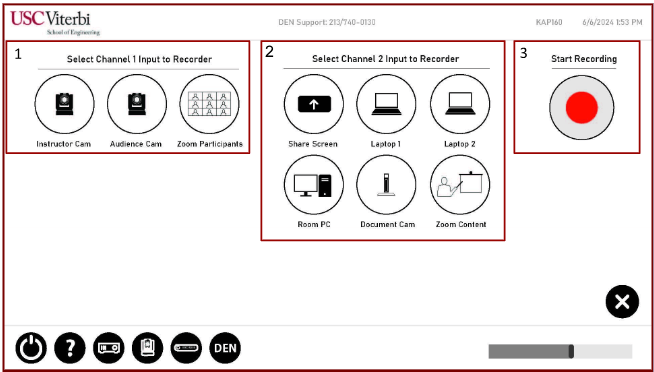
- Pressing the Recorder icon at the bottom of any touch panel menu screen will bring up the Self-Record menu page.

- From this page you can initiate a video and audio recording using either of the room cameras and a selected content source. Backup recordings are saved on a physical drive mounted inside the instructor desk. To get access to a backup recording after class, contact dentsc@usc.edu with the following information:
- The room number, day, and time of recording
The steps to initiate a recording are as follows:
- Select the Camera source that you would like to record:
- Instructor Cam = Faces the front of the classroom (instructor area).
- Audience Cam = Faces the rear of the classroom (in-class students).
- Zoom Participants = A tiled view of all remote participant cameras which is available while the room system is in a Zoom meeting.
- Select the Camera source that you would like to record:
- Share Screen = Wireless device share using pin displayed on screen.
- Laptop 1 = Wired device share using Laptop 1 cables (HDMI, USB-C, or VGA).
- Laptop 2 = Wired device share using Laptop 2 cables (HDMI, USB-C, or VGA).
- Room PC = Consult Viterbi IT for login credentials.
- Document Cam = Selecting this device will automatically activate it (you will see a light turn on). Fold up the arm to position the camera and place your content on the base plate.
- Zoom Content = Whichever source is currently set to display content in an active Zoom meeting will be displayed here. Select this option if you plan to share from a remote device through Zoom.
- Once you have selected your sources, press the Start Recording button to initiate the recording.
- While a recording is in progress, the Start Recording button will change to a Stop Recording button and the Recorder icon at the bottom of the touch panel screen will flash red.
- To return to the touch panel Home Page to initiate or end a Zoom meeting or to make changes to the display sources, press the X icon in the bottom right corner.

- Once your class has ended, please remember to Stop the recording. Press the Recorder icon at the bottom of any touch panel menu screen to return to the Self-Record mode page. THen press the Stop Recording button.
